Jane’s Real Whole Grain Bread
 Jane Day
Jane Day is co-author with Dr. John Day of "The Longevity Plan," documenting their journey to China's Longevity Village. "Preparing food for guests has always been a stressful thing - feeling inadequate and fearing that the dishes wouldn't turn out. Posting recipes has been an exercise in the ultimate confrontation of this fear. Gratefully, the joy in figuring out how to make favorite dishes with healthier ingredients now exceeds the fear and I take courage in the idea that maybe I can help someone else do the same." |
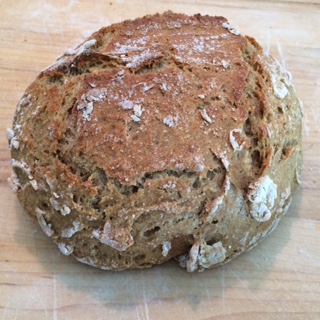
This bread is crusty on the outside and chewy on the inside. It is by far the fastest (when you plan ahead) and most delightful bread I’ve ever made, and it is really the only one I make these days. It resembles the loaves you buy at the farmers market or bakery for $5 or more and costs little to make.
The first time through, as you are familiarizing yourself with the process, it will take longer to make. But it now takes me 10 minutes total prep time. I can throw the ingredients together in a bowl right before bed, let it sit over night, then throw it in a pre-heated ceramic pot in the oven at dinner time the next day.
If you don’t already own a grinder or a heavy cast iron or ceramic pot, it also requires some investment in equipment. We have found the investment in both of these items to be very worthwhile to us.
Grinding your own flour greatly enhances the taste, texture, and nutritional content of the bread. It gives you control over which grains, beans, and legumes you’d like to include. By using the coarse (instead of fine) setting, you can reduce the glycemic index and enhance the health benefits.
I like to freshly grind up a mixture of any of the following organic grains roughly in order of most to least: wheat, kamut, barley, amaranth, millet, spelt, oat groats, quinoa (make sure it is rinsed and dried, Costco and other stores offer this), just a dash of garbanzos, white beans, lentils, etc.. I then add up to 1 cup pre-ground almond flour which makes for a moist and lower glycemic bread than the traditional breads.

- 3 cups freshly ground whole grains the coarse setting helps delay the absorption of the grain which reduces the glycemic index and enhances the taste
- 1/2 tsp instant yeast
- 1 1/4 tsp coarse kosher salt
- 1 5/8 cup water
- 1. In a large bowl combine flour, yeast and salt. Add 1 5/8 cups water, and stir until blended; dough will be shaggy and sticky. Cover bowl with plastic wrap or towel. Let dough rest at least 12 hours, preferably about 18, at warm room temperature, about 70 degrees. 2. Dough is ready when its surface is dotted with bubbles. Lightly flour a work surface and place dough on it; sprinkle it with a little more flour and fold it over on itself once or twice. You can follow step 3 for a bit fluffier loaf, but I am usually in a hurry and just form a ball and go straight to step 4, which is to put it in a pre-heated pan.) 3. Cover loosely with plastic wrap and let rest about 15 minutes. Using just enough flour to keep dough from sticking to work surface or to your fingers, gently and quickly shape dough into a ball. Generously coat a cotton towel (not terry cloth) with flour, wheat bran or cornmeal; put dough seam side down on towel and dust with more flour, bran or cornmeal. Cover with another cotton towel and let rise for about 2 hours. When it is ready, dough will be more than double in size and will not readily spring back when poked with a finger. 4. At least a half-hour before dough is ready, heat oven to 450 degrees. Put a 6- to 8-quart heavy covered pot (cast iron, enamel, Pyrex or ceramic) in oven as it heats. When dough is ready, carefully remove pot from oven. If you skipped step 3, plop the dough into the pot. If you followed step 3, slide your hand under towel and turn dough over into pot, seam side up. It may look like a mess, but that is O.K. Shake pan once or twice if dough is unevenly distributed; it will straighten out as it bakes. Cover with lid and bake 30 minutes, then remove lid and bake another 15 to 30 minutes, until loaf is beautifully browned. Cool on a rack.
Disclaimer Policy: This website is intended to give general information and does not provide medical advice. This website does not create a doctor-patient relationship between you and Dr. John Day. If you have a medical problem, immediately contact your healthcare provider. Information on this website is not intended to diagnose or treat any condition. Dr. John Day is not responsible for any losses, damages or claims that may result from your medical decisions.
Thank you for this recipe! I found that my Magic Bullet drink cup grinds the flour quickly so I don’t have to get out my bulky vintage Magic Mill.
The big question is: does the three cups of milled grains include the one cup of almond flour? Or is it three cups of milled grains plus one cup of almond flour?
I made this bread today. I like the crustiness of it. However it did not raise at all. I’m wondering if I should first dissolve the yeast in warm water before adding it to the flour? Or perhaps use more yeast? I did not grease the Dutch oven but believe I need to.
Hi Jerry! Thank you for sharing this comment. I do find that when I use whole grains, I get a denser bread than when I use white flour. I have just assumed this is the tradeoff. I am not an expert baker for sure! So, if someone knows of a tip or trick that would help whole grain bread to raise more, please share!
All the best,
Jane
Hi Jane,
Thanks for all your wonderful recipes. This bread looks healthy and I wondered if you would share the grain mill you use, please?
Thanks!
Deb
This bread recipe looks yummy and healthy! I am wondering if the cup of almond flour is part of the 3 cups of freshly ground whole grains, or is in addition to it. I did not see the almond flour in the list of ingredients, so I wasn’t sure about that. I also want to thank you both for a very helpful website, and your willingness to be vulnerable about the things you have struggled with, and what has helped you. That makes a big difference!
Hi Jacqui,
The beautiful thing about this recipe is that you can substitute in whatever type of “flour” you want. Nut flours are great.
Best,
John
Dr. Day, You and your wife Jane are doing a great work by giving us well documented information week after week. I love Jane’s recipe for bread this week. I have been looking for a bread that incorporates legumes and so many good grains. Thank you for your information on a happy life. You certainly exude these qualities as you reach out to us in a caring, helpful way.
Hi Marge,
Thank you so much for your kind words!!! Thanks for reading!
Best,
John
I love this news letter and today’s seem to be particularly insightful for me. I do much of this but sometimes we simply need that lift from someone. That is what this did for me today. Thank you
Hi Debra,
Thank you so much for your kind words! So glad to hear today’s newsletter was particularly insightful for you! You definitely gave us a lift today!
John